Wilton Gum Paste and Fondant Course III.II 蛋糕裝飾課  

今天的花美不勝收,有清麗脫俗的海芋Calla Lily、嬌豔欲滴的玫瑰Rose,與溫暖娟秀的康乃馨Carnation。

還記得第一堂的玫瑰花底座與康乃馨底座嗎?今日就要用上它們~

上週下課前老師千叮嚀萬囑附,為了方便塑型,這些底座一定要完全風乾(至少2天),

所以如果搬運過程中不小心陣亡了一兩個,一定要在事前補做!


◎ Calla Lily 海芋

說到海芋就想到陽明山竹子湖,還有我在花田裡跌得狗吃屎...

不過我本人對海芋十分有好感,花園裡的第一批植物堅持種上這一捲又一捲葉子比花搶戲的海芋。

海芋的原型原來是顆愛心,先切好一個心形白色翻糖,將四周用球形塑型棒抹薄,覆蓋上錐形模型;

clayx花萼的部份,切出半圓形綠色翻糖,覆蓋至錐形尖端,風乾;

最後是spadix肉穗花序,捏出一長條黃色翻糖,再沾黏上黃色sprinkle sugar糖粒,黏進花瓣中心。

Wilton Gum Paste and Fondant Course III.II 蛋糕裝飾課 Wilton Gum Paste and Fondant Course III.II 蛋糕裝飾課   Wilton Gum Paste and Fondant Course III.II 蛋糕裝飾課  

Wilton Gum Paste and Fondant Course III.II 蛋糕裝飾課 Wilton Gum Paste and Fondant Course III.II 蛋糕裝飾課 Wilton Gum Paste and Fondant Course III.II 蛋糕裝飾課  

image via Wilton


◎ Rosebud and Rose 玫瑰花蕾和玫瑰花

玫瑰果然是Wilton的強項,這款玫瑰操作簡單但效果真的很美~

取出玫瑰底座,用梅花形模型壓出花瓣,用刮刀於花瓣連結處往內畫一刀,再用球形塑型棒抹薄,

將花瓣中心穿過義大利麵,片片包覆玫瑰底座,交錯排列重複三次即為玫瑰花蕾,再重複三次即為正常版玫瑰。

clayx花萼的部份,切出海星形綠色翻糖,從底部包覆所有花瓣,風乾。

Wilton Gum Paste and Fondant Course III.II 蛋糕裝飾課 Wilton Gum Paste and Fondant Course III.II 蛋糕裝飾課 Wilton Gum Paste and Fondant Course III.II 蛋糕裝飾課

Wilton Gum Paste and Fondant Course III.II 蛋糕裝飾課 Wilton Gum Paste and Fondant Course III.II 蛋糕裝飾課 Wilton Gum Paste and Fondant Course III.II 蛋糕裝飾課    

image via Wilton


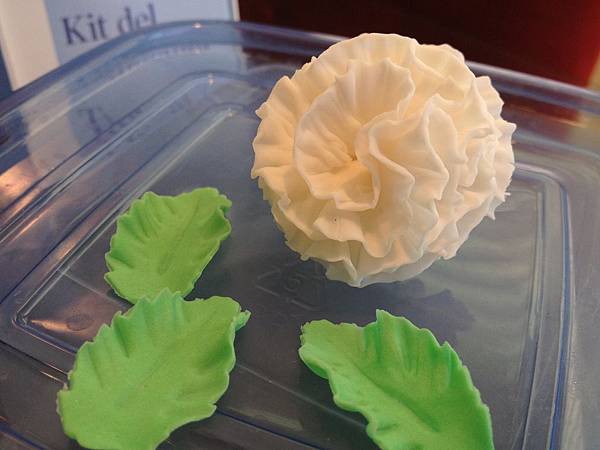
◎ Carnation 康乃馨

康乃馨層層疊疊,就像媽媽的愛~

取出康乃馨底座,壓出圓形白色翻糖約六片,用尖頭塑型棒在薄海棉上壓出皺摺滾邊ruffle,

層層黏在底座上,再用塑型棒調整花瓣讓形狀自然完整。

Wilton Gum Paste and Fondant Course III.II 蛋糕裝飾課 Wilton Gum Paste and Fondant Course III.II 蛋糕裝飾課 Wilton Gum Paste and Fondant Course III.II 蛋糕裝飾課  

 image via Wilton


最後還教了葉子,以葉子形模型壓模,用尖頭塑型棒在薄海棉上壓出皺摺滾邊及中間葉脈,於葉緣用指尖塑型。

下課後驚覺這堂課也太省翻糖了,僅取一小小坨桿薄切割後,還可回收剩下的翻糖邊邊,

加加減減幾乎是整球帶去整坨帶回,好像也算是相當經濟齁,可喜可賀~ 

Wilton Gum Paste and Fondant Course III.II 蛋糕裝飾課

photo 004

photo 005  


arrow
arrow

    Belle's Lab 發表在 痞客邦 留言(5) 人氣()